

Given my 'off the grid' situation, the roof has large clear plastic panels to provide natural light. Even though the inverter, humming in its corner close to the battery bank, is quite capable of converting enough power from the stored DC energy in the batteries to light up the shop, I am keeping my consumption to a dull roar. I have been blessed with a creek on my land, albeit it is more a seasonal occurrence. There is enough runoff to supply my power needs for 7or 8 months, and then it dries up in the summer. That is when the whole operation starts to rely on solar and the occasional, yikes, gasoline generator backup. The noise and pollution is something Cindy and I find difficult to tolerate, it seems to be such an insult in the silence of our woods. The kayaks fortunately do not require much power tool activity, once I have my old growth snags milled into boards and cut into ¼" strips. I attempt to do most of my pre machining in the rainy season, when the brook is causing the mini hydro plant to whirl, and the table saw is munching through the cedar as if it was butter. The 2 routers, that shape each planklet into a cove and bead strip, are also modest power consumers. After stockpiling enough strips for a summer, the rest of the kayak is a result of sharp hand tools, fresh sheets of sandpaper, rolls and rolls of masking tape (the secret weapon of the cabinet maker), as well as bungies, glue, and elbow grease. Somewhere in there is a good helping of patience, a commodity which I acquired only by sheer determination.

This morning I get to tackle the deck of a 'Cape Ann Expedition' by One Ocean Kayak's designer Vaclav Stejskal. This model is my favorite. I just received 3 commissions in a row for this design, and frankly, I am not surprised by it's popularity.
I have also built the "Guillemot" designed by Nick Schade and the "Endeavor" by Bear Mountain Boats. I will build any model my customer prefers.
| I must confess that my approach to kayaks is not very 'technical' in the sense that I am aware of all the finest nuances in performance amongst the various types. I come to the choice more by what appeals to me visually, i.e.: the lines of the craft and what I have learned about utility, such as: susceptibility to wind, capacity to take gear, rocker for easy turning or pronounced keel at the stern to improve tracking. Here the 'Expedition' is everything I am looking for. The lines are so elegant, working around the mold and creating color contrasts with the various hues in the cedar is a sheer pleasure. Staple holes, frequently seen in the home built variety of strippers are unnecessary, since each strip is held in place until the glue dries by various means. As a rule it is a combination of masking tape and bungies, but sometimes I must resort to hot melt glue the strip to the form or keep it in place with clamp combinations and blocking. The curvy ends are the most stubborn, as there is considerable tension in the curve. When the strong back needs to be removed, I just tap the station molds which were hot melted to the strips, to release. |  |
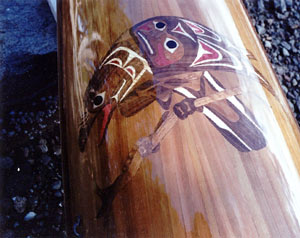
The deck of this particular kayak is to sport a marquetry assembly of 5 different kinds of veneer. It depicts a Haida raven by Vancouver Island artist Glen Rabina, who has graciously given permission to reproduce his original design on the kayak as an inlay piece. The bow also has a First Nation's raven inlay, so the task is to come up with a deck layout, which ties together the lines of the boat with the traditional shapes of a Haida graphic.

Working the strips and the patterns are a mixture of pleasure and pain. When inspired I just cannot wait to see the idea in wood, yet it also is agony, since the patterns are created by cutting into the existing deck, and that makes it very final. There is a lot of 'mocking up' trying to visualize the final result, before the Olfa knife and router come out. The customers are very involved in the deck design. I take frequent photos of the process and mock ups, to email them to the client for editing. Once the wooden part is constructed and sanded, the next risk is to make sure there are no cross grain scratches left over from the fairing process. While quite invisible now, they tend to be glaring once the epoxy hits the woodwork. Nothing is worse then to see them clear as day behind a layer of glass and resin, and this needs to be prevented at all cost. The 'wet out' itself has in its process the potential for beauty as well as many pitfalls, which are difficult or impossible to correct. The temperature of the resin, hull, and shop will profoundly affect how well the glass is being saturated, and therefore how clear it is going to be. The timing and sequence needs to be just so, or the glass/epoxy will be affected. I find Raka epoxy is most suitable, because it is more liquid at colder temperatures and so tends to assure a more thorough wet out. The quality of the glass cloth is a factor as well. I use 6oz glass on the hull inside and out, double layer under the bottom to protect against abrasion. The deck I cover with 4oz on the outside, 6oz on the inside. I suppose it could be considered the adventure part of the process, as anything worthwhile is only accessible through taking a risk, good planning, concentration and hard work. And then there is the ever-raging battle to attain a product as close as possible to the elusive perfection. While very worthy as a goal, it is a double-edged sword, which can drive a craftsman to distraction or financial ruin. The result of roughly 375 hours in the shop, depending on detail, is a kayak, which looks spectacular and out performs anything else in the kayak world. I frequently find myself trying to undo the myth that shiny finish equal fragile. Any kayak will get scratched if run into rocks or dragged over gravel, but the overall strength and ability to resist a blow, which would puncture or shatter a fiberglass boat, is clearly superior in a cedar stripper. The wood core will not fatigue in time, as glass composites will: the cedar fiber is flexible yet tough in conjunction with the glass/resin skin inside and out. The use of automotive clear coat instead of varnish provides the shiny salt and UV resisting surface, which protects the epoxy and the underlying wood. The inevitable scratches can be repaired with epoxy.

| The hatch lids are secured with brass toggle buttons from Phoenix Lock Company. The foot braces I attach without puncturing the hull, using stainless bolts secured into blocks that have been epoxied in place. The seat is of comfortable foam under a nylon mesh, made by Nimbus |  |
My cedar comes from the local forest. After locating a large log, which had been used as a bridge timber on a logging road, I had it sawn into planking by the local mill. I enjoy finding and recycling the high quality cedar timber, which seems to have been considered a less desirable species by loggers of the past. I have recycled yellow and red cedar with growth rings so small that it is difficult to count. My hardwoods are imported and include bubiga, walnut, ebony, sycamore, rosewood and purple heart. Recently I also inlayed abalone and mother of pearl.
 |
Kayaks from my shop have found their way into a variety of lakes, lagoons and oceans from Pudget Sound to Florida. The finished kayaks can be picked up here, or be wrapped and shipped via a special boat carrier. My current base prices range from US$7000 for the "Endeavour" to US$7500 for more complex models such as the Cape Ann Expedition, and doubles start at US$8900. I charge $30/hr shop time for extra work such as inlay or graphics. |
The cedar kayak glides through the water without any noise, and the woodnotes on my deck seem to belong in the forested coastal inlets and bays. I do not want to intrude in this landscape as I hope to be part it. I am thankful for the privilege to experience what seems to be an ever-shrinking frontier from within this elegant glider made of cedar and high tech materials. To me this is the perfect marriage of the ancient and the modern, of beauty and performance.

